So, I promised a project for crafters, and a project for sewists. They're both equally cute and useful and each are great ways to bust some scraps and use up every last precious bit of Paperie.
Paperie is the first line of fabric from Art Gallery Fabrics designed by Amy Sinibaldi of NanaCompany and i'm sure it won't be her last. So let's make some gift tags.
If you follow me on Instagram, I gave you guys the heads up to buy some gift tag packs from Targets dollar spot but if you didn't get a chance to, any old chipboard tags will do.
Here's what you'll need to get started:
Chipboard tags
Ribbon or lace
Wood buttons or scrapbook embellishments
Fabric scraps at least larger than your tags
Mod Podge
Foam paintbrush
Scissors
Hot glue gun
Cover about three quarters of your tag with a thin layer of mod podge. Lay a scrap down on the tag and press down flat so no bubbles form, making sure to press firmly near the edges.
Now cut some ribbon or lace bits to length and hot glue them to your tags to hide the raw top edge of the fabric. Once you've finished all your tags, you can start to trim the excess from your edges using a ruler and an exacto knife, rotary tool or scissors.
Now you can start to hot glue on some wood buttons or stars or hearts for the finishing touch. That's it! Just add some twine or ribbon to tie them onto packages and gifts and don't forget to make a million because you'll be sad to see them go!
I hope you guys enjoy this little project and head over to Instagram (I'm tinkerellen) for a fun giveaway (all the supplies to make your own AND some already made tags!) from me and a chance to win a charm pack of Paperie from Amy!
Thanks guys, happy making!
Cheri
Showing posts with label easy. Show all posts
Wednesday, January 27, 2016
Saturday, May 23, 2015
A scrappy necklace tutorial
What do you do with all those teeny precious scraps? Well, keep them of course! And make lots of teeny adorable things, like these easy wood and fabric pendant necklaces... They're perfect with summer tees and denim. I wore mine yesterday with a teeshirt and my painting jeans for a quick run to pick up more basement floor paint. Covered in paint and I still felt pulled together! Ha! SO here we go:
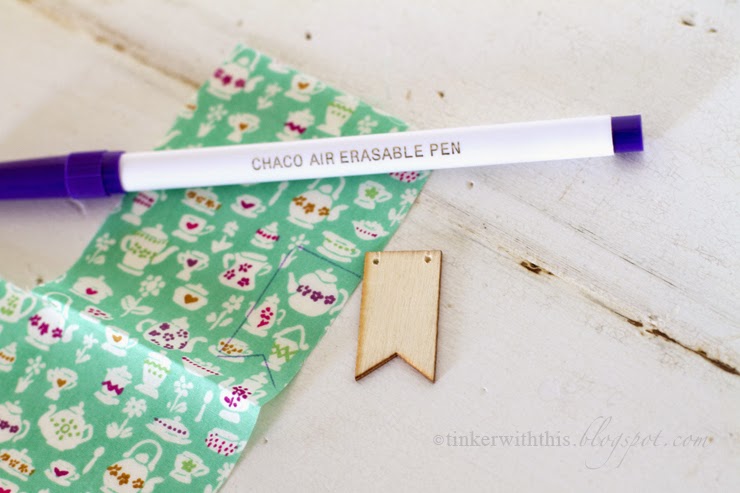
Some supplies you'll need: Little wooden shapes. I found mine in the scrapbooking section of a local craft store. You can find them online or in your craft stores or Tjmaxx/Marshalls stores. Small jump rings and coordinating chain. Scraps of your favorite fabrics. Needle nose pliers. Scissors (not pictured). Mod podge and a sponge brush (not pictured). Seam ripper. Pen or disappearing ink pen.
Step one: Using your seam ripper or a sharp pointed object, poke two holes into the wood piece.
Step two: Trace your wood shape onto your fabric scrap and cut out. Make sure to cut a bit inside your traced line.
Step three: Spread a drop of mod podge onto your wood piece and place the cut scrap on top. Press down with your fingers to ensure the scrap is evenly attached.
Step four: Spread a drop of mod podge over the top of the fabric to seal it.
Step five: After dry, poke back through your holes to create holes in the fabric. Now attach your jump rings, first through the hole in the wood/fabric and then onto your necklace. Close the jump ring and attach the second one.
That's it, you're done! Now go make a million of these, they're so addicting and the perfect way to show off your textile love. Happy crafting!
Some supplies you'll need: Little wooden shapes. I found mine in the scrapbooking section of a local craft store. You can find them online or in your craft stores or Tjmaxx/Marshalls stores. Small jump rings and coordinating chain. Scraps of your favorite fabrics. Needle nose pliers. Scissors (not pictured). Mod podge and a sponge brush (not pictured). Seam ripper. Pen or disappearing ink pen.
Step one: Using your seam ripper or a sharp pointed object, poke two holes into the wood piece.
Step two: Trace your wood shape onto your fabric scrap and cut out. Make sure to cut a bit inside your traced line.
Step three: Spread a drop of mod podge onto your wood piece and place the cut scrap on top. Press down with your fingers to ensure the scrap is evenly attached.
Step four: Spread a drop of mod podge over the top of the fabric to seal it.
Step five: After dry, poke back through your holes to create holes in the fabric. Now attach your jump rings, first through the hole in the wood/fabric and then onto your necklace. Close the jump ring and attach the second one.
That's it, you're done! Now go make a million of these, they're so addicting and the perfect way to show off your textile love. Happy crafting!
Tuesday, April 21, 2015
The cozy blankie tutorial
So....it's been a while! This is my official first blog post for 2015. Let's make it a good one, shall we?
Who wants to learn how to make the easiest softest cutest blankie? You do? Great. You're going to need a few things.
Supplies:
Half yard cut of 'the soft' fabric...Seriously. I don't know what it's called but it's the same material all those really cozy throw blankets from TJMaxx and HomeGoods are made out of.
FQ of coordinating cotton fabric
Scissors
Pins or clover clips
Intermediate or above knowledge of sewing
Okay. Cut your cuddly fabric to approximately 18x24". Cut your cotton fabric to approximately 16.5x22.5". Lay your inner piece on top of the cuddly piece (centered), wrong sides facing each other. Now start folding your cuddly fabric over the edge of the inside fabric, pinning as you go. Just like you would a binding. If you need help on instructions for a 'faux binding' try a quick search on Pinterest. There are lots of great tutorials out there.
Now it's time to sew. Can you manage a straight line? Then you can make one of these.
Just stitch all the way around with a top stitch, making sure your cuddly fabric doesn't come unfolded. You won't see it if you have to unpick and restitch but it's a pain! (PS: I like to add a little tab of ribbon as an accent, just tuck it under your 'binding' before sewing.) Once you've managed to make your way around all the edges, you are done! Congrats. Now wasn't that easy? See? I wouldn't lie to you. Happy making!
Labels:
baby blanket,
bebe,
blankie,
blanky,
craftilicious,
crafting,
DIY,
easy,
fabric,
nap time sewing,
projects,
sewing,
simple
Tuesday, October 14, 2014
A Baby Take-Along Blankie
Since his sister has her own blankie (3, actually), I decided Levi needed his own to perhaps save myself from future battles of blankieism. This little blanket was simple and easy, and all the contrast and bright colors seem to keep an inquisitive baby's attention.
I started with some random placed 4" squares and just stitched them together for a patchwork look. Most of the fabrics are organic cotton which is nice and soft. I wanted the blanket to have a thinner feel for little fingers to grab, so I opted for one layer of flannel in between as a batting. A little X quilting through the blocks and I was ready to attach the back. I didn't want to do a binding on this particular blanket, so I quilted the top to the flannel and then sewed to the back piece (simple cream flannel), fronts facing each other. Then after I left a section unstitched, I turned the blanket inside out (or right side out!) and gave it a quick iron. Now it was time for my top stitch to finish the edges and close up that gap!
Its simple, sweet and the perfect size (18" square) for a carseat blankie or a security blankie without being too overwhelming.
Let me know if you have any questions and happy crafting!
xo - Cheri
Labels:
baby blanket,
bear,
craftilicious,
crafty,
deer,
easy,
nap time sewing,
organic cotton,
quilt,
quilty,
sewing,
simple,
woodland
Wednesday, January 29, 2014
First post of 2014! WooHoo!
Yes, almost an entire month into the year. Looks like I have let this blog drift off a bit...I'll have to work on that! Instagram seems to be my social media of choice lately, but I need to sit down and write more, for me, for you, for sanity I suppose.
There's a lot going on right now. Mostly the little boy growing inside my belly, but also a LOT of crafting/sewing.
I've actually been updating my shop more often, so I thought I would throw out some pretty pictures and a free shipping coupon code. So if you plan to buy yourself a little Valentine this year {I totally do that every time I visit Target}, you won't have to waste your money on shipping it.
There's a lot going on right now. Mostly the little boy growing inside my belly, but also a LOT of crafting/sewing.
I've actually been updating my shop more often, so I thought I would throw out some pretty pictures and a free shipping coupon code. So if you plan to buy yourself a little Valentine this year {I totally do that every time I visit Target}, you won't have to waste your money on shipping it.
Labels:
coupon,
craftilicious,
crafty,
easy,
easy shop,
free shipping,
inventory,
patchwork,
sewing,
tinkerwiththis,
valentines day
Wednesday, December 18, 2013
DIY chalkboard gift tags: For Christmas and beyond
So chalkboard is all the rage, right? We're well aware of that by now especially if you're a Pinner. I love the idea of chalkboard reusable gift tags but I haven't found any that I fell in love with or that I was willing to pay outrageous bucks for. Enter a random stroll down the craft aisle. I found some wood laser cut tags for Mason jars and my head immediately came up with a brilliant plan. So I bought them. {Of course, it's probably not all that brilliant, in fact, I bet you could find a gazillion tutorials on this exact thing via Pinterest, but we'll just go with my crafty brilliant intuition, shall we?}
So here's what you really need:
paintbrush
chalkboard paint {I happen to always have the stuff lying around…}
painters tape or masking tape
chalkboard pen
wooden tags {I found mine at ACMoore, $1.99 for ten.}
{Ignore that white crayon, I thought it would be a genius idea to use a washable crayon but it hardly showed up on the tag at all. Genius to stupid in one quick stroke.}
Step 1:
Tape your tags where you want the chalkboard paint to end. I made mine simple but you can get fancier if you've got the time. These are fairly small so I wanted to get as much writing space as possible but still keep some of the wood showing. You can paint the whole thing if you want and skip this step entirely. Up to you.
Step 2:
Coat the top with your chalkboard paint. I found it really seeped into the raw wood, so I ended up doing three coats, which really didn't take me that long at all.
Step 3:
Remove the tape and decorate! I ended up using my trusty chalk marker. The crayon didn't show up, the Target chalk pens were too light for what I wanted, and I didn't dare try the white colored pencil since I've previously noticed they don't erase off. Also these were too small to use regular chalk, and I don't want the tags to get accidentally erased in transit, so chalk marker it was.
Ah, aren't they pretty?! And if you're like me and, you have everything else on hand, they only ended up costing me .20 cents a piece!
Labels:
chalkboard,
Christmas,
craftilicious,
crafty,
DIY,
easy,
gifting,
tags,
wood
Wednesday, December 11, 2013
DIY Mushroom Pincushions: a tutorial of sorts
You know you want to make one of these. Or maybe a few, for your sewing friends this Christmas…
The nice thing is they're boxes, so inside you could store measuring tape or extra pins or really anything you wanted. To get started you'll need a few things. First, the round box. I found mine at A.C. Moore for $1.00 each. How's that for inexpensive project? You'll also need stuffing, scrap fabric, scissors and hot glue/gun. Also you will need paint or wood stain, depending on what you choose to do with the bottom. The top pincushions have painted bases, the one at the end of this post has a stained base. Both were easy and quick, but the stained one did need to set outside for a night to get rid of the smell.
Step 1: Sandwich the stuffing in between the fabric and the box lid. Start hot glueing the four corners, keeping the stuffing in between and keeping it a little snug as you go. You want the fabric and stuffing to sit off the top a little to give it that mushroom shape. Once you have the four corners, start glueing the rest of the fabric to the lid.
Step 2: Once you've completed that, trim the excess fabric down, leaving enough to glue inside the edge.
Now here's the options part. You can go over and inside with the glue and fabric like I did, or if you don't have enough room when the lid is on the base {mine was fairly loose} then you may want to explore other ways to finish the edge. I tried cutting the fabric so there would be nothing glued to the inner portion of the lid.

I also tried glueing close to the top of the lid, trimming the fabric and then glueing on a piece of ribbon to keep everything hidden and snug. I honestly didn't like this option so much. It made things a little busier in my opinion. BUT if you want to do it that way, go ahead! Like I said, There are options at this point. What you do with them is up to you!
And then, you're pretty much finished! You can rework the stuffing a bit to get a better shape if you need to, but regardless it will look like a little mushroom when you're done.
PS: I do apologize for the photo quality. I was experimenting using my phone to capture the process and have come to the conclusion that I need to suck it up and pull out the big camera next time…
Wednesday, October 16, 2013
All that glitters is gold
I splurged on a clearance frame at Target with an idea in mind. If it didn't work out I figured I was only out $1.78. My bright idea? A gold accent frame. Something simple and subtle and to be honest, the result was exactly what I was looking for.
Start with a cheap frame, it doesn't need to be accented with a color like mine was, just have a bit of an edge so the gold paint actually shows up. Subtle but not invisible, right? Then buy yourself some gold metallic paint. You don't have to go with a tub of paint like I did, I was just saving myself a trip to the craft store since I already had plans for the home improvement store. I show a sponge brush, but really in the end I just ended up using a regular brush to avoid all the bubble/texture effect that I was getting using the sponge.
After a few coats, this is the result:

Ahhh, that's better. Simple, sweet and a touch of glam. {Sorry about the photos, they're iPhone pics!}
Start with a cheap frame, it doesn't need to be accented with a color like mine was, just have a bit of an edge so the gold paint actually shows up. Subtle but not invisible, right? Then buy yourself some gold metallic paint. You don't have to go with a tub of paint like I did, I was just saving myself a trip to the craft store since I already had plans for the home improvement store. I show a sponge brush, but really in the end I just ended up using a regular brush to avoid all the bubble/texture effect that I was getting using the sponge.
After a few coats, this is the result:

Ahhh, that's better. Simple, sweet and a touch of glam. {Sorry about the photos, they're iPhone pics!}
Labels:
craftilicious,
crafty,
easy,
for the home,
frame,
glam,
gold,
simple
Saturday, October 05, 2013
This old foreclosed home: a coat of paint covers all sins
So maybe a coat of paint doesn't cover all the sins of ignoring exterior maintenance, but it sure helps. This poor house sat sad and alone for who knows how long, so it's safe to say the exterior was ignored. Since we finished 98% of the interior build/projects, this summer has been all about the outdoors. We've taken back control of the landscaping, laid a bunch of rocks and torn out a lot of weeds, but we still have finish work to do like leveling out areas and planting grass.
Our shed and barn need a majority of the work as well, and at this point we're still trying to decide if we keep and repair the old, or we knock it down and replace it with something we really want, that functions the way we need it to. Tough decisions like that usually get weighed on the budget scale...
Another glaring problem was all the ignored wood around the place. Our back stairs off the sunroom were about to be replaced until we decided to try a product called 'Deckover' by Behr. You can find it at Home Depot. It's like painting with cake batter. Thick and stinky, but it goes on well and fills in gaps and holes. Once we did that, it seemed like the steps were fine! They'll last a few more years anyway, until we've stopped hemorrhaging money and a couple hundred dollars to fix some steps doesn't seem like a big deal.
Since that worked so well, I decided the front porch could use a coat. Plus, it was a nice color that matched our brown trim{not my favorite, but oh well}, Dark Walnut. After a good wire brush scraping to remove built-up mold and peeling old paint, I shopvacced the area, removed all the leaves and went to work.
Here's a quick before and after comparison. I should have taken a few close-ups to show the worn out state of the place, but this will have to do. Trust me, after your porch/deck has been ignored for probably ten years, it's going to look sad. So now we have this updated and clean porch to walk onto every day! I love that the exterior white primer/paint combo I used for the railings really makes them pop. You didn't really notice there was a porch there before! Another side thing happened during the project that affected the look as well. Our oil tank leaked and we had to have it replaced. At that time we decided to move it across the basement like we wanted {if we're paying for it anyway!} and remove the ugly stinky pipes from the front sidewalk. They're now lovely and tucked away on the side of the house behind a bush. Not sure why they were in the walkway in the first place anyway! For now my potted mums are hiding the patch of concrete and the chopped pipes that we'll have to fix.
Another quick project I decided to tackle while I had all the supplies handy was painting the front porch columns. It wasn't that time-consuming, but I think it makes the whole mix of white and brown trim look a little more planned. Plus, they were worn as well and needed a little tlc before they became too bad to save. So just an hour or so and a few coats of white paint freshened everything up a bit. Now the sidewalk just needs a good powerwashing and we'll be ready for winter...
Our shed and barn need a majority of the work as well, and at this point we're still trying to decide if we keep and repair the old, or we knock it down and replace it with something we really want, that functions the way we need it to. Tough decisions like that usually get weighed on the budget scale...
Another glaring problem was all the ignored wood around the place. Our back stairs off the sunroom were about to be replaced until we decided to try a product called 'Deckover' by Behr. You can find it at Home Depot. It's like painting with cake batter. Thick and stinky, but it goes on well and fills in gaps and holes. Once we did that, it seemed like the steps were fine! They'll last a few more years anyway, until we've stopped hemorrhaging money and a couple hundred dollars to fix some steps doesn't seem like a big deal.
Since that worked so well, I decided the front porch could use a coat. Plus, it was a nice color that matched our brown trim{not my favorite, but oh well}, Dark Walnut. After a good wire brush scraping to remove built-up mold and peeling old paint, I shopvacced the area, removed all the leaves and went to work.
Here's a quick before and after comparison. I should have taken a few close-ups to show the worn out state of the place, but this will have to do. Trust me, after your porch/deck has been ignored for probably ten years, it's going to look sad. So now we have this updated and clean porch to walk onto every day! I love that the exterior white primer/paint combo I used for the railings really makes them pop. You didn't really notice there was a porch there before! Another side thing happened during the project that affected the look as well. Our oil tank leaked and we had to have it replaced. At that time we decided to move it across the basement like we wanted {if we're paying for it anyway!} and remove the ugly stinky pipes from the front sidewalk. They're now lovely and tucked away on the side of the house behind a bush. Not sure why they were in the walkway in the first place anyway! For now my potted mums are hiding the patch of concrete and the chopped pipes that we'll have to fix.
Another quick project I decided to tackle while I had all the supplies handy was painting the front porch columns. It wasn't that time-consuming, but I think it makes the whole mix of white and brown trim look a little more planned. Plus, they were worn as well and needed a little tlc before they became too bad to save. So just an hour or so and a few coats of white paint freshened everything up a bit. Now the sidewalk just needs a good powerwashing and we'll be ready for winter...
Labels:
deckover,
easy,
for the home,
home,
maintenance,
outside,
paint,
projects,
this old foreclosed home
Tuesday, October 01, 2013
Bravo for breakfast: paleo-friendly apple cider pancakes and baked apples

First of all, don't these look amazing? Second, they were easy. Which in my world is the only word I even bother with.
Here's all the info to make your own:
Apple Cider Paleo Pancakes
Ingredients:1 cup almond meal
2 eggs
1/4 cup apple cider
2 tbs coconut oil
1/4 tsp salt
1 tbs honey {I opted out of this since my cider was fairly sweet}
Directions:
Mix all ingredients together and prepare on a skillet like you would any other pancakes.
Baked Apples
Ingredients:6 apples, peeled and sliced {your choice, but I used Macouns}
2 tbs cinnamon
1-2 tbs ghee {or butter, softened}
1-2 tbs honey
Directions:
Mix all ingredients in an oven-safe casserole dish or glass baking dish. Bake at 350º for 1 hour or until apples are soft. Make sure you stir the mixture 1-2 times during baking.
That's it. These are both so simple to do and absolutely tasty. Mmm mm. Let's hear it for breakfast!
Labels:
apple,
breakfast,
cherilehnow photography,
delicious dishes,
easy,
food,
pale,
pancakes,
recipe
Wednesday, September 25, 2013
Craftilicious: hold my hand...warmers
With cooler weather approaching, I've been inspired to sit inside my sewing room during nap time and whip up some of these adorable and easy rice-filled hand warmers. As you can see, I think I made more than enough. They work fantastic too. I tested one out last night as a foot warmer in the bottom of the bed and it seems I need to make a couple of larger ones since the husband decided to share mine. I only microwaved it for about a minute, but it stayed warm for close to an hour. Perfect for those chilly nights, especially if you hate wearing socks to bed, like me...
I loosely followed this tutorial, using my own size measurements. {Pinaholics, you can PinIt here.} I also made myself some larger rectangular versions, for eye pillows. Two of them are filled with 2 cups of flax seed but the other one is filled with 1 3/4 cups of rice. You can also add some lavender in with the flax seed if you want something with a lovely scent. I have an old one I made for myself years ago that I use consistently when the husband is taking too long brushing his teeth in the bathroom before bed and the lamp is glaringly bright.
The project was easy and simple, and quick! {Not to mention a fantastic way to use up those small fabric leftoevers.} It took hardly any time to sew and stuff these. I think I'll make some more for handmade Christmas gifts. How sweet would these be inside a mug along with some tea bags or hot cocoa mix? Think about all the cold hands you could keep warm this winter? Do your part. Craft your hearts out.
Labels:
cherilehnow photography,
craftilicious,
crafty,
easy,
fabric,
gifting,
sewing,
simple
Monday, July 08, 2013
DIY personalized memo board tutorial
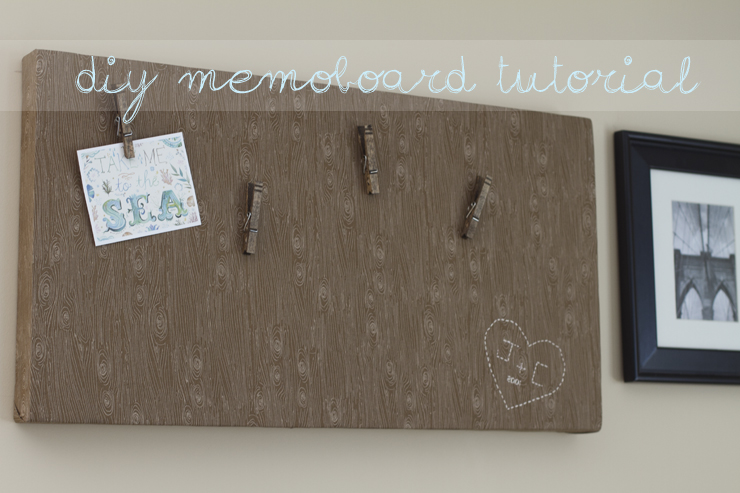
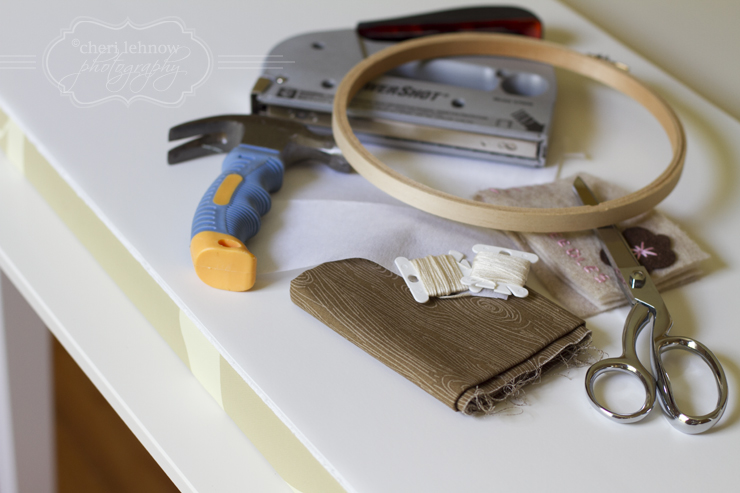
The other day I decided I wanted something less formal and more functional above our bed. Artwork that was a little more me. I happened to have a bunch of supplies around so I whipped up a quirky little memo board that I can use as art by itself, or to hang and showcase different prints or photos.Supplies you'll need:
embroidery hoop
embroidery needle
embroidery floss
staple gun
fabric of your choice
stiff but then fusible interfacing
hammer
scissors
posterboard
canvas {I used a thrift store find, which was just large enough for my space and only cost me a few dollars.}
To get started, just cut your posterboard to the size of your canvas and stick it on with some glue or tape. It doesn't have to be extremely permanent since the fabric will be holding it all together eventually.Now get started on your embroidery. I cut a paper heart out as a template and then traced it onto my fabric. I then freehanded the letters and numbers. Place your fusible interfacing on the back of the fabric {behind your art} and iron on, then put that whole area inside the embroidery hoop and pull tightly. Once everything is secure, you can start sewing the outlines with your floss/thread. I did a very simple stitch to keep it casual. {And I don't know how to do any fancy stitches anyway!}
One you're finished with your embroidery, you can start stapling your fabric to the canvas. Start at one end and put a few staples in, one in the middle and one on each edge, then pull tight on the opposite side making sure your fabric is flat and straight, then staple tight on that side. Continue all around your edges until you have a nice taut piece of fabric on the front. Try to fold your corners in neatly and secure with staples.
At this point, you're basically finished. You can hang that baby, throw some thumbtacks in it and marvel at your awesomeness. For me, I wanted to go a step further. I took some clothespins, added some wood stain and once they were dry I used e6000 glue to adhere some thumbtacks to them. I now have a completely personalized piece of decor for our master bedroom. And I love it. I hope this inspires you to make a custom piece for your room, office or kitchen! Cheers!
Labels:
cherilehnow photography,
craftilicious,
crafty,
decor,
easy,
fabric,
home,
shabby chic,
this old foreclosed home,
wall art
Wednesday, June 12, 2013
Easy {& cheap} wall art for the home
Have a wall to fill but don't have big money to spend on frames? Try thinking outside the frame. Buy a few photo mattes, print some family photos and hang them using simple office supplies like binder clips. I went all fancy and decorated my clips with washi tape. I made a grouping of three 11x17s with 5x7 openings but you can do whatever works for your space. Maybe a pair of 2 or a group of 6 in two rows of three? The possibilities are endless. And you can change out the photos in a jiff!
Labels:
cheri lehnow photography,
clips,
crafty,
easy,
for the home,
matte,
office supplies,
wall art,
wash tape
Subscribe to:
Posts (Atom)