Showing posts with label cherilehnow photography. Show all posts

Monday, November 18, 2013

DIY woodland tictactoe game: the finished product


Okay so I'm going to go a little backwards on this one. First I'll show you the project, then I'll break it down with tutorials on how to make each piece. Which works out great since I have a few to make for Christmas gifts.


I had this crazy idea pop into my head one day, and three days later I was finally able to get it out of my brain and into a tangible product. Sometimes creativity is a curse. I made the fox discs after some Target ornament inspiration, and the mushrooms were a design for the new nursery. Both were easy to make and I'll show you how in separate tutorials. The tictactoe board was a simple mini-quilt if you will, made up of 9 - 3.5" squares. Again, I'll do a separate tutorial for that as well.


For now you get to see how cute the end product is:


Friday, November 08, 2013

DIY Wooden Mushroom Ornaments: a tutorial


Well, last night was a crafting success. I instructed 20+ ladies on making these, and not a single one thought they were difficult! Everyones was completely different and they all wanted to make more. So here is a quick photo-guided tutorial in case you want to make some of these babies on your own. I warn you though, they're highly addicting...

First, some supplies you'll need are pictured below. Twine, wood glue, paint, brushes and of course the wood pieces. I've shot a close-up of the packaging of the two wood crafting shapes I've used so you'll know exactly what to look for. I purchased mine at Hobby Lobby.

The actual first step that I forgot to document is drilling a small hole in the top of the split ball in order to screw in the eyelet. The eyelets can also be purchased from Hobby Lobby for $1.99. Now start to paint your top and bottom. An easy way to hold the little guys while painting is by the eyelet for the top of the mushroom and by placing the bottom of the mushroom on the wood end of a paintbrush pictured below. 

Once you've finished painting your wood pieces, you will glue them together. Use a small amount of wood glue and smooth out with your finger. Don't use too much or it will get messy when you press the pieces together. Attach the bottom to the flat center of the top like this:

Now you can start to paint your dots/circles. One girl last night even painted stripes, which was adorable. You can really be creative at this part if you want, or like me just stick with small and medium size spots.

There is one additional step that is completely optional. I coated just the spotted tops in a layer of mod podge. It gave them a bit of a sealed look and feel. A little less matte if you will.


And there you have it. For ornaments, cut and attach a little bit of twine to the eyelet and you're done. If you want to use them for packaging, just attach them to whatever ribbon or twine you're wrapping your box with. You can also skip attaching an eyelet if you want to keep them for figurines or standing. They would make great pieces for a homemade tic tac toe game. So if you're anything like me, you'll go make about a million of these to use as you please. Enjoy!


Friday, October 11, 2013

Hi, my name is Cheri, and I made a quilt.


Which to me, is the equivalent of running a marathon. Okay, maybe a half marathon. I finally decided enough was enough. I was going to make a quilt. I've started and schemed a few in the past, but I never actually finished them. I'm not very good at big time-consuming projects. I tend to have crafting ADD. If I can't sit down and finish something that day {or in an hour}, I lose interest and it gets lost in the closets of supplies. Sad unfinished projects haunt my craft room.

But this time would be different! And it turns out it was. Encouragement from quilter friends and instagram kept me going so much that I finished it within a few hours. Bravo me! Seriously, besides my desire for the kiddo to have a homemade quilt of her own, the reality of actually finishing a quilt is my craft success of the year. So the fact that I took so many photos to document it isn't a surprise. Here's some eye candy for you all on this chilly Friday morning. Enjoy! {Ignore the folding lines in the quilt, I'm new at this.}

Wednesday, October 09, 2013

Fall for me

I headed down to the local museum/gardens to try to take some beautiful fall photos. Well, as it would turn out, the leaves aren't exactly peak yet and the kiddo didn't really want to have anything to do with it. So much for my big ideas. Here she is looking dismayed, until we found ourselves some fun rotten fruit to peel apart. She does love to destroy things.


After the meltdown was over, and the fun began, I was able to snap a few photos of her. Not too many of them looking at the camera of course.

Regardless, it was a beautiful autumn day, and we made the most of it. In our own separate ways.

Wednesday, October 02, 2013

Play day project day

Yesterday was a stay home and play kind of day. Play for her, work for me anyway. God gave me one last week of nice weather to finish off all those exterior painting projects I've been procrastinating on. Thanks Lord, I'll get right on that.

We did, however, manage to play most of the time she was awake and save the majority of the painting for the nap hours. Turns out, giving a 2 year old a paintbrush and asking her to help isn't exactly smart. Especially if neither of you are wearing painting clothes.

So, after an epic meltdown when I took the brush and paint away, I decided it was time to have some inside {washable} painting time. This girl does love to paint. She gets that from me I suppose. Here's my little artist taking her work very seriously:

And a new tool. Everyone loves exploring new ways to create. I'd like to explore a nap right about now, but back to those gnarly outdoor projects! I'll have some before and afters for you soon. It's amazing what a coat {or two or three} of paint can do...

Tuesday, October 01, 2013

Bravo for breakfast: paleo-friendly apple cider pancakes and baked apples


First of all, don't these look amazing? Second, they were easy. Which in my world is the only word I even bother with.

Here's all the info to make your own:

Apple Cider Paleo Pancakes

Ingredients:
1 cup almond meal
2 eggs
1/4 cup apple cider
2 tbs coconut oil
1/4 tsp salt
1 tbs honey {I opted out of this since my cider was fairly sweet}

Directions:
Mix all ingredients together and prepare on a skillet like you would any other pancakes.

Baked Apples

Ingredients:
6 apples, peeled and sliced {your choice, but I used Macouns}
2 tbs cinnamon
1-2 tbs ghee {or butter, softened}
1-2 tbs honey

Directions:
Mix all ingredients in an oven-safe casserole dish or glass baking dish. Bake at 350ยบ for 1 hour or until apples are soft. Make sure you stir the mixture 1-2 times during baking.

That's it. These are both so simple to do and absolutely tasty. Mmm mm. Let's hear it for breakfast!

Wednesday, September 25, 2013

I guess there have been a few changes around here lately...


Craftilicious: hold my hand...warmers

With cooler weather approaching, I've been inspired to sit inside my sewing room during nap time and whip up some of these adorable and easy rice-filled hand warmers. As you can see, I think I made more than enough. They work fantastic too. I tested one out last night as a foot warmer in the bottom of the bed and it seems I need to make a couple of larger ones since the husband decided to share mine. I only microwaved it for about a minute, but it stayed warm for close to an hour. Perfect for those chilly nights, especially if you hate wearing socks to bed, like me...


I loosely followed this tutorial, using my own size measurements. {Pinaholics, you can PinIt here.} I also made myself some larger rectangular versions, for eye pillows. Two of them are filled with 2 cups of flax seed but the other one is filled with 1 3/4 cups of rice. You can also add some lavender in with the flax seed if you want something with a lovely scent. I have an old one I made for myself years ago that I use consistently when the husband is taking too long brushing his teeth in the bathroom before bed and the lamp is glaringly bright.

The project was easy and simple, and quick! {Not to mention a fantastic way to use up those small fabric leftoevers.} It took hardly any time to sew and stuff these. I think I'll make some more for handmade Christmas gifts. How sweet would these be inside a mug along with some tea bags or hot cocoa mix? Think about all the cold hands you could keep warm this winter? Do your part. Craft your hearts out.


Tuesday, August 06, 2013

A thrifty transformation: step right up


I have a bad habit of thrifting. It's not necessarily bad, if you enter with the mindset that everything can be altered. I mean, sure, every now and then you find something perfect as it is, but that's rare. I tend to have a better shopping experience when I bring my friend Marybeth, because two sets of eyes spot something fabulous better than one, AND we both happen to love the same style/things. It's usually a win/win for both of us.

This particular time I went alone, but I did score an outdoor play house {awe. some.} and this step stool. Which as you can see above, was hideous at first buy.


A whole lot of spray paint later {those fish were not cooperating, i.e.: seeping through the paint} and we have a lovely usable stool for looking out the window at the passers by. I used some old American Crafts rub-ons to add some color and life to it. I was going to do a classy modern look, but I realized that sometimes kids like to have kid-like stuff, so animals it is. Not shabby for a four dollar thrift store find. Just remember kids, {and by kids, I mean adults} spray paint is your friend. And giraffes are too. {And primer.}


Monday, July 15, 2013

The ocean, she calls to me

Some friends invited us to their beach house for a day this past week. It was marvelous to say the least and the rainy weather held off until our drive home. The overall feeling of the beach community is so relaxed and inviting, by the end of the day we were debating purchasing a house and commuting two hours a day.


At first E was a little upset by all the dirty, gritty sand everywhere. Until she realized it was one giant sandbox. Then she was in love. She played for hours and didn't even bother to take her afternoon nap, although I caught her laying in the sand a couple of times out of sheer exhaustion.


These two finally warmed up to each other and decided to play together in the sand.

But that didn't last long. He was getting a little grabby for her taste.


We thoroughly enjoyed our beach day. We've waited far too long to get to the water this summer so from here on out we'll be back plenty of times to say hello.

Friday, July 12, 2013

I'm hooked: a DIY hanging station

So you know all those beautiful knobs and drawer pulls that are all over the place now? I have a slight addiction. I pick them up all over the place and have a stash ready for when a project pops into my head. Like this one. A sweet little hanging station for behind the door.

This version is simple. All I did was cut a piece of pallet board down to the size I needed, and drilled three holes clear through, large enough for the hardware on my drawer pulls to fit through. The tricky part is drilling a hole large enough to fit the nut on the backside, but only halfway through the board. You want to be able to make your hardware completely flush with the back of the board so it hangs nice and smooth on the wall.

When I had all the pulls/knobs tight on the board, I took a metal saw blade on my Dremel and cut off the backs of the screws that were sticking out past my board. I didn't take pictures along the way, but I'm sure I'll be making more of these, so I'll try to remember to document the steps next time.

So after about 15 minutes, I had myself a custom hanging station for the guest room. Give it a shot, they're extremely easy. And I just hung mine up with a couple of drywall screws that you really can't see unless you're looking too close...


Monday, July 08, 2013

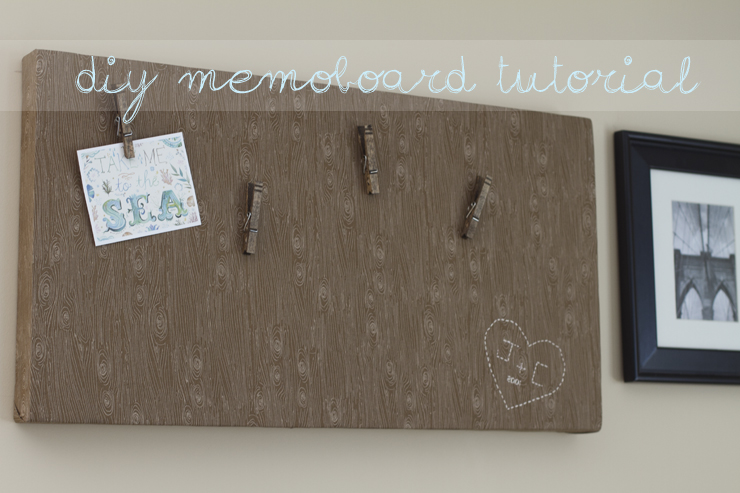
DIY personalized memo board tutorial

The other day I decided I wanted something less formal and more functional above our bed. Artwork that was a little more me. I happened to have a bunch of supplies around so I whipped up a quirky little memo board that I can use as art by itself, or to hang and showcase different prints or photos.

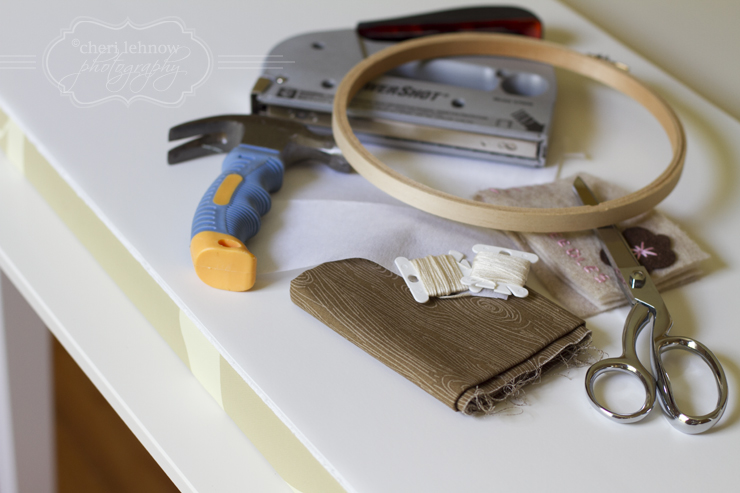
Supplies you'll need:
embroidery hoop
embroidery needle
embroidery floss
staple gun
fabric of your choice
stiff but then fusible interfacing
hammer
scissors
posterboard
canvas {I used a thrift store find, which was just large enough for my space and only cost me a few dollars.}

To get started, just cut your posterboard to the size of your canvas and stick it on with some glue or tape. It doesn't have to be extremely permanent since the fabric will be holding it all together eventually.

Now get started on your embroidery. I cut a paper heart out as a template and then traced it onto my fabric. I then freehanded the letters and numbers. Place your fusible interfacing on the back of the fabric {behind your art} and iron on, then put that whole area inside the embroidery hoop and pull tightly. Once everything is secure, you can start sewing the outlines with your floss/thread. I did a very simple stitch to keep it casual. {And I don't know how to do any fancy stitches anyway!}

 One you're finished with your embroidery, you can start stapling your fabric to the canvas. Start at one end and put a few staples in, one in the middle and one on each edge, then pull tight on the opposite side making sure your fabric is flat and straight, then staple tight on that side. Continue all around your edges until you have a nice taut piece of fabric on the front. Try to fold your corners in neatly and secure with staples.


 At this point, you're basically finished. You can hang that baby, throw some thumbtacks in it and marvel at your awesomeness. For me, I wanted to go a step further. I took some clothespins, added some wood stain and once they were dry I used e6000 glue to adhere some thumbtacks to them. I now have a completely personalized piece of decor for our master bedroom. And I love it. I hope this inspires you to make a custom piece for your room, office or kitchen! Cheers!


Related Posts Plugin for WordPress, Blogger...