Showing posts with label simple. Show all posts

Saturday, May 23, 2015

A scrappy necklace tutorial

What do you do with all those teeny precious scraps? Well, keep them of course! And make lots of teeny adorable things, like these easy wood and fabric pendant necklaces... They're perfect with summer tees and denim. I wore mine yesterday with a teeshirt and my painting jeans for a quick run to pick up more basement floor paint. Covered in paint and I still felt pulled together! Ha! SO here we go:


Some supplies you'll need: Little wooden shapes. I found mine in the scrapbooking section of a local craft store. You can find them online or in your craft stores or Tjmaxx/Marshalls stores. Small jump rings and coordinating chain. Scraps of your favorite fabrics. Needle nose pliers. Scissors (not pictured). Mod podge and a sponge brush (not pictured). Seam ripper. Pen or disappearing ink pen.


Step one: Using your seam ripper or a sharp pointed object, poke two holes into the wood piece.


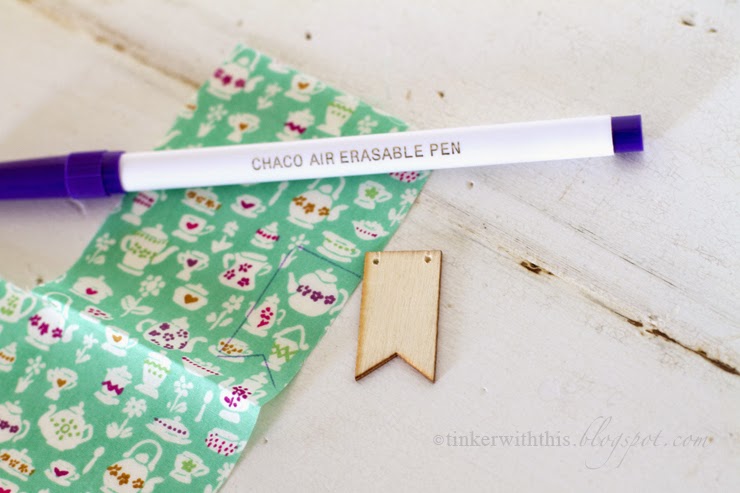
Step two: Trace your wood shape onto your fabric scrap and cut out. Make sure to cut a bit inside your traced line.


Step three: Spread a drop of mod podge onto your wood piece and place the cut scrap on top. Press down with your fingers to ensure the scrap is evenly attached.
Step four: Spread a drop of mod podge over the top of the fabric to seal it.


Step five: After dry, poke back through your holes to create holes in the fabric. Now attach your jump rings, first through the hole in the wood/fabric and then onto your necklace. Close the jump ring and attach the second one.

That's it, you're done! Now go make a million of these, they're so addicting and the perfect way to show off your textile love. Happy crafting!

Tuesday, April 21, 2015

The cozy blankie tutorial

So....it's been a while! This is my official first blog post for 2015. Let's make it a good one, shall we?


Who wants to learn how to make the easiest softest cutest blankie? You do? Great. You're going to need a few things.

Supplies:
Half yard cut of 'the soft' fabric...Seriously. I don't know what it's called but it's the same material all those really cozy throw blankets from TJMaxx and HomeGoods are made out of.
FQ of coordinating cotton fabric
Scissors
Pins or clover clips
Intermediate or above knowledge of sewing

Okay. Cut your cuddly fabric to approximately 18x24". Cut your cotton fabric to approximately 16.5x22.5". Lay your inner piece on top of the cuddly piece (centered), wrong sides facing each other. Now start folding your cuddly fabric over the edge of the inside fabric, pinning as you go. Just like you would a binding. If you need help on instructions for a 'faux binding' try a quick search on Pinterest. There are lots of great tutorials out there. 


Now it's time to sew. Can you manage a straight line? Then you can make one of these. 


Just stitch all the way around with a top stitch, making sure your cuddly fabric doesn't come unfolded. You won't see it if you have to unpick and restitch but it's a pain! (PS: I like to add a little tab of ribbon as an accent, just tuck it under your 'binding' before sewing.) Once you've managed to make your way around all the edges, you are done! Congrats. Now wasn't that easy? See? I wouldn't lie to you. Happy making!


Tuesday, October 14, 2014

A Baby Take-Along Blankie

Since his sister has her own blankie (3, actually), I decided Levi needed his own to perhaps save myself from future battles of blankieism. This little blanket was simple and easy, and all the contrast and bright colors seem to keep an inquisitive baby's attention.


I started with some random placed 4" squares and just stitched them together for a patchwork look. Most of the fabrics are organic cotton which is nice and soft. I wanted the blanket to have a thinner feel for little fingers to grab, so I opted for one layer of flannel in between as a batting. A little X quilting through the blocks and I was ready to attach the back. I didn't want to do a binding on this particular blanket, so I quilted the top to the flannel and then sewed to the back piece (simple cream flannel), fronts facing each other. Then after I left a section unstitched, I turned the blanket inside out (or right side out!) and gave it a quick iron. Now it was time for my top stitch to finish the edges and close up that gap! 


Its simple, sweet and the perfect size (18" square) for a carseat blankie or a security blankie without being too overwhelming. 


Let me know if you have any questions and happy crafting!
xo - Cheri

Wednesday, December 11, 2013

DIY Mushroom Pincushions: a tutorial of sorts


You know you want to make one of these. Or maybe a few, for your sewing friends this Christmas…

The nice thing is they're boxes, so inside you could store measuring tape or extra pins or really anything you wanted. To get started you'll need a few things. First, the round box. I found mine at A.C. Moore for $1.00 each. How's that for inexpensive project? You'll also need stuffing, scrap fabric, scissors and hot glue/gun. Also you will need paint or wood stain, depending on what you choose to do with the bottom. The top pincushions have painted bases, the one at the end of this post has a stained base. Both were easy and quick, but the stained one did need to set outside for a night to get rid of the smell.


Step 1: Sandwich the stuffing in between the fabric and the box lid. Start hot glueing the four corners, keeping the stuffing in between and keeping it a little snug as you go. You want the fabric and stuffing to sit off the top a little to give it that mushroom shape. Once you have the four corners, start glueing the rest of the fabric to the lid.

Step 2: Once you've completed that, trim the excess fabric down, leaving enough to glue inside the edge.


Now here's the options part. You can go over and inside with the glue and fabric like I did, or if you don't have enough room when the lid is on the base {mine was fairly loose} then you may want to explore other ways to finish the edge. I tried cutting the fabric so there would be nothing glued to the inner portion of the lid.


I also tried glueing close to the top of the lid, trimming the fabric and then glueing on a piece of ribbon to keep everything hidden and snug. I honestly didn't like this option so much. It made things a little busier in my opinion. BUT if you want to do it that way, go ahead! Like I said, There are options at this point. What you do with them is up to you!


And then, you're pretty much finished! You can rework the stuffing a bit to get a better shape if you need to, but regardless it will look like a little mushroom when you're done.

PS: I do apologize for the photo quality. I was experimenting using my phone to capture the process and have come to the conclusion that I need to suck it up and pull out the big camera next time…

Wednesday, October 16, 2013

All that glitters is gold

I splurged on a clearance frame at Target with an idea in mind. If it didn't work out I figured I was only out $1.78. My bright idea? A gold accent frame. Something simple and subtle and to be honest, the result was exactly what I was looking for.

Start with a cheap frame, it doesn't need to be accented with a color like mine was, just have a bit of an edge so the gold paint actually shows up. Subtle but not invisible, right? Then buy yourself some gold metallic paint. You don't have to go with a tub of paint like I did, I was just saving myself a trip to the craft store since I already had plans for the home improvement store. I show a sponge brush, but really in the end I just ended up using a regular brush to avoid all the bubble/texture effect that I was getting using the sponge.


After a few coats, this is the result:


Ahhh, that's better. Simple, sweet and a touch of glam. {Sorry about the photos, they're iPhone pics!}

Wednesday, September 25, 2013

Craftilicious: hold my hand...warmers

With cooler weather approaching, I've been inspired to sit inside my sewing room during nap time and whip up some of these adorable and easy rice-filled hand warmers. As you can see, I think I made more than enough. They work fantastic too. I tested one out last night as a foot warmer in the bottom of the bed and it seems I need to make a couple of larger ones since the husband decided to share mine. I only microwaved it for about a minute, but it stayed warm for close to an hour. Perfect for those chilly nights, especially if you hate wearing socks to bed, like me...


I loosely followed this tutorial, using my own size measurements. {Pinaholics, you can PinIt here.} I also made myself some larger rectangular versions, for eye pillows. Two of them are filled with 2 cups of flax seed but the other one is filled with 1 3/4 cups of rice. You can also add some lavender in with the flax seed if you want something with a lovely scent. I have an old one I made for myself years ago that I use consistently when the husband is taking too long brushing his teeth in the bathroom before bed and the lamp is glaringly bright.

The project was easy and simple, and quick! {Not to mention a fantastic way to use up those small fabric leftoevers.} It took hardly any time to sew and stuff these. I think I'll make some more for handmade Christmas gifts. How sweet would these be inside a mug along with some tea bags or hot cocoa mix? Think about all the cold hands you could keep warm this winter? Do your part. Craft your hearts out.


Tuesday, July 02, 2013

Craftilicious: Rope jewelry

I took a few minutes this weekend to make these:


This necklace/bracelets set was made for the little one, but I've got a set in the works for myself. They're really simple, quick and incredibly cute. This could even make for a fun rainy-day craft for older kids (5+), boys included. I think everyone would enjoy making these. I found the tutorial here. The bag of rope was only a few dollars at Home Depot and the acrylic paints I used are only 50 cents or so per color. 


Wednesday, May 22, 2013

Craftilicious: Washi tape projects and inspiration

I know, I know. How many more washi tape crafts will I post this month?!? Well, lucky for you I've got a few more to cover. For now, here's a compilation of past and present washi tape projects to give you all some ideas.

Light switch plate covers:


Washi tape thumbtacks:


Magnets made to look like ripped pieces of tape:

Chipboard letter covered in various washi tape:

Try covering a glass container or a tin:

Office clips prettified:

Use washi tape to decorate a handmade gift and make for a fabulous presentation:

And a washi tape decorated clothespin, holding up another one of my craft projects so it can dry. Adorable AND handy, let's hear it for washi tape.

Tuesday, May 21, 2013

Delicious Dishes: Baked ziti and summer veggies

Well, I tried another recipe I found using Pinterest. You can find the recipe here. It was actually fantastic even though this picture isn't at all pretty. Honestly, the husband and I were so hungry that I had to stop him before he dug in. I needed my photo after all. Usually he's annoyed by me being a photog, but he's ok with anything that gets him more delicious meals.

It was easy to make, a little bit of prepping veggies, but the rest is mixing and baking. I liked it a lot since it was nice and airy, no red sauce, and packed with veggies since the husband has requested less rice and more living foods...


Tuesday, April 23, 2013

Craftilicious: Button necklaces

I originally found this button necklace tutorial. And here's the Pinterest link for all Pinners out there. My goal this year is to use up a lot of my current 'craft' supplies instead of having to rush to the store each time I want to make something. So I've been sifting through my 'pins' and choosing projects to help me do that. I have a whole room full of 'stuff' and not enough time to justify it all.

 This project seems perfect. It uses a lot of buttons I had lying around, and it makes something fun for the bebe to play with. For now I think I'll mostly be wearing them so she can play with them while I'm holding her in stores or waiting in lines. She also likes to play with my necklaces while she gets a diaper change. 


This is an easy in front of the tv project. I managed to make a couple in about 15-20 minutes. She recommends using glue to keep the string ends from fraying but I used an embroidery needle to make things incredinly easy and quick. I made a rainbow version so we could learn our colors, but I love how cheerful it is so it might become a staple for summer fun outfits.


Wednesday, April 10, 2013

Delicious Desserts: blackberry crumble

Doesn't this look amazing? That's probably because it is. It was simple and easy. I'll keep this in the recipe book for a nice relaxing summer day. You can find instructions here.


Monday, March 25, 2013

Delicious Dishes: Slow cooker split pea soup

I've decided that there is no way to prettify pea soup. It just looks like green mush no matter what you do to it. But trust me on this one, it tastes fantastic. This is my new go-to comfort soup for winter. It's not your mama's pea soup. This one uses chicken sausage. Strange you say? Well, if you have an anti-ham eating husband this is a perfect compromise. You can find the recipe here and, again, if you want info on all those Pinterest recipes I've been trying, you can find my board here.


Monday, March 11, 2013

Craftilicious: skeleton key necklace

A quick Pinterest project, originally here, is this awesome vintage key necklace.


It was a really quick project, and the next one I do {and there will be more} will probably include more colors and more coverage. This one I wanted to keep simple because I loved the top design so much. I used three colors of polish, and this small clamp which just made it easier to hold and stand the key for painting and drying.


You can find keys at your local flea market, and maybe even new ones at the big box home stores, but I've never looked so I can't confirm that. Mine are from a flea market. I bought several for just a couple of dollars. Score.

 And here's a photog hint. Below are two versions of the same photo. The left one was shot without any 'aids'. The right one was taken with the help of a piece of junk mail. Yes, junk mail. When you have a really dark heavy shadow from directional sunlight, it helps to hold up a white paper or envelope behind the object, so the light bounces off the paper and into the shadow. See, a more professional and bright image, voi la:


Related Posts Plugin for WordPress, Blogger...