Thursday, October 27, 2011

fall into me

The leaves are sad. They tried and tried to make a glorious appearance this year, but every time they started to glow, the rain came and washed them out of their trees. So now there are just a lot of sad lonely brown leaves laying around everywhere. I have managed to catch a few bright spots:
IMG_0466_leaves.jpg

Well, lots of things have been happening around here. I've managed to have a few photo sessions on the better weather days. I turned 34. I grew about 97" in my belly. Maybe not that drastic but it sure feels that way. I've been working almost full-time, as in 6 out of the last seven weeks which is awesome, but also very exhausting. I am officially 33 weeks along, with no child birthing classes in sight. I keep trying but for some reason I live in the part of the state that's anti-natural. If only I lived in Oregon...

Marybethy was oh so very kind enough to get out her camera and spend a Sunday with us, shooting a few wonderful pictures for me to cherish:
320006_10150340964656896_545881895_8238177_1662412866_n.jpg

298166_10150340938801896_545881895_8237993_1601302087_n.jpg

304157_10150340939146896_545881895_8238000_1608899911_n.jpg

Friday, October 21, 2011

this old foreclosed home: a 'main' to 'guest' bath

upbath_before.jpg

Well here's our upstairs {guest} bathroom before picture. Nasty yes? They really loved blue at the time, so the sink, shower and even the flooring all matched. Lovely. Those we knew we had to change. Then we realized the walls had to go too. They were a very thin plastic panelling, painted over, a bad decision all around. And that trim? Ghastly!

Once we had it down to bare walls we started making our design choices. The four piece tub we installed is fantastic. This is actually the second house we've put one in and they're very easy to install and even easier to keep clean. There's no grout to worry about so the white stays white for the long-haul. We also opted to match our vanity to the downstairs bathroom since we loved the countertop so much. This one has plenty of space for our guests to spread out and get ready. {The blue may end up changing, but for now I love it and the husband just deals with it.}

upbath_after02.jpg

upbath_after01.jpg

upbath_after03.jpg

The only complaint we had about this bathroom, was the space. It's extremely tight when you have two people getting ready in the morning. My husband would bump into the doorknob all the time and that really drove him nuts. Luckily, for him, there was a bigger better badder bathroom on the way...

Thursday, October 20, 2011

The nursery has promise

It doesn't have any furniture, but it has promise. Well, it does have a pink chair:
IMG_0047.jpg

Great prints that make me happy:
IMG_0421.jpg

Some lovely canvas art:
IMG_0416.jpg

A small pink mirror in desperate need of a clean:
IMG_0422.jpg

And a bow holder inside the closet, made by moi:
IMG_0419.jpg

Nothing matches really, and I like it that way.

Tuesday, October 18, 2011

this old foreclosed home: a half-bath with history

Well this is what we had to work with when we bought our place, a half-bath that was dark, dingy and pineapple-y. Lots and lots of pineapples. Pineapples on the wallpaper, pineapples etched into the cabinets, pineapples on the toilet paper holder, apparently the 80's were good to pineapples. It was rough to say the least. In fact, it was the only room with wallpaper, thank goodness, because 30yr old wallpaper is stubborn.

So here's where it started, and the extent of how far we had to demo to get it going. The ceiling was a surprise fix, but it all worked out in the end. When we removed the vanity we found this interesting note, and thought it was great to find a little history buried behind the walls.
downbath_before.jpg
downbath_before02.jpg

Here's our after, much brighter and a lot less fruity. In fact, there's not a single fruit or vegetable in the joint.
downbath_after01.jpg

The upper half of the walls were stripped of the wallpaper, and the lower half were covered in wainscoting. The paneling was attached horizontally on purpose. I promise. Although we did it to avoid seams, it gives it a little more of a modern feel. I did all the trim myself, so the easier the better. The sink and vanity are from Lowe's Allen&Roth collection and it's a deep java color. It works well with all the white, and the counter space is amazingly ample for a small bathroom like this one. The mirror is from IKEA, and cost about 40-50$. The neat thing is, it was the perfect size to cover the giant hole left by the built-in cabinet. We didn't cover up the note or the hole, which gives us easier access to the lighting wires.
downbath_after03.jpg

And here's a nifty trick for storing toilet paper in a pretty and functional way. This covered glass container cost $5 at TJMaxx and it sits right below out towel rack, so keeping water out of the jar was essential.
downbath_after02.jpg

So there you have it, a half-bath worthy of showing off. The only odd thing that gets people every time? The light switch is outside the bathroom!

Monday, October 17, 2011

i love you always

Who doesn't love all the new graphic prints as art out there now? I actually saw this quote on a distressed piece of wood and although it was lovely, it wasn't worth the $100 price tag. So in short, I made my own. For about $2. Much more reasonable, and although very different and much smaller, it works for what I wanted it for.
IMG_0410.jpg

All you need is a printer, an 8x10 canvas and some mod podge. I printed my quote out on regular printer paper and cut to size. Layer your canvas with a very thin layer of mod podge and then apply your paper to the top. Smooth it out and leave to dry. Make sure it's fully dry before attempting the top coat. Once it IS completely dry, layer a thin top coat of mod podge for protection. You use thin layers and allow drying time to avoid bubble. Have patience, and your project will come out almost perfect. Like this:
IMG_0412.jpg

IMG_0411.jpg

IMG_0413.jpg

I bought a 10-pack of 8x10 canvases at Michaels, and used a 40% off coupon for a whopping total of $1.20 per canvas. And just for my lucky readers, I've made this print available to you all for FREE. Yep, free. To download, just go here and click on download original size. Happy canvasing!

Tuesday, October 04, 2011

Dan and Bethany: lakeside wedding FINAL PACKAGING

So I finally mailed out the end result of the wedding shoot back in the end of July. When you get the family and friends discount, you seem more patient, but you also get more goodies...

I wanted to try out a few things I've seen, and my attempts were not in vain. The bride and groom loved them.

First I made a coaster set, which I've done before, just not with photos. All in all the process is the same and the result was beautiful. I'm going to make myself a set of Brooklyn ones as soon as I have some spare time.
dbwed_coasters.jpg

Then I made a larger 6x6 tile, to be used for setting cooking utensils on or as a pot holder or even to display on a plate holder.
dbwed_trivet.jpg

The one thing I absolutely loved was the canvas art. I used an 8x10, so I could print from home, but if you had something printed for you, a larger canvas would work too. It was bubbling up a bit, but once all the mod podge dried, it was flat and beautiful.
dbwed_canvas.jpg

I put in some extra effort and wrapped everything up in wax paper and then tissue paper to make sure nothing stuck or was injured in travel. The tags were made with some brown kraft paper and stamps and I used twine to wrap it all. Add some bubble wrap and it was good to go. Go dear pictures, be free!
dbwed_packaging.jpg

Monday, October 03, 2011

this old foreclosed house: a kitchen recap

Well, since we're down to about two things left to do in the kitchen, I figure it's as close as we're getting to finished right now. So here are the pics, including the brandy new backsplash...

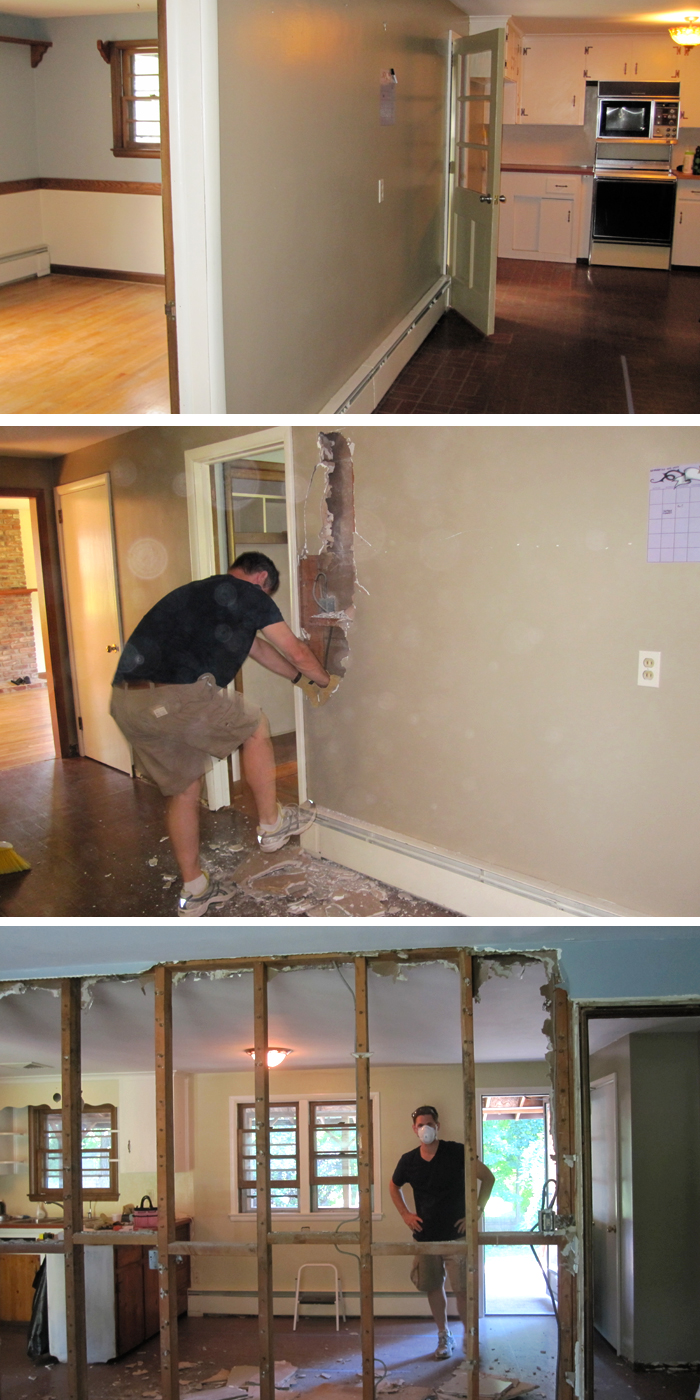
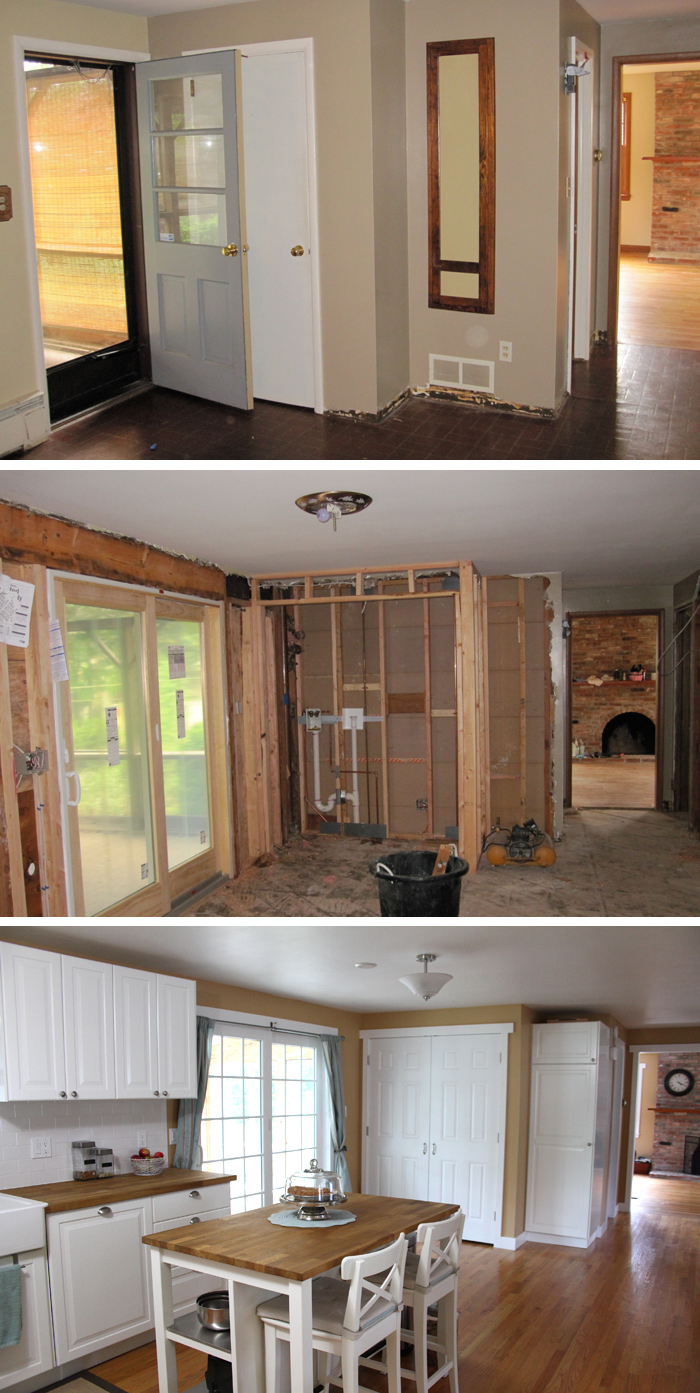
The wall that HAD to go. The kitchen was too dark and cavelike with the other room closing it off. Since I'm not big on first floor bedrooms, especially ones with windows right next to both home entries, we decided we could afford to lose it. In essence, we went from 4 to 3 bedrooms, but gained a dining room and an office space {which most people use a bedroom for anyway}. But honestly, it was one of the least expensive and most important decisions we made in this home redesign. It was a load bearing wall though, so we had the professionals come in to install the new support beam that was later approved by the inspector. Here's the hubby doing a good job of demo-ing:
kitchen_wall.jpg

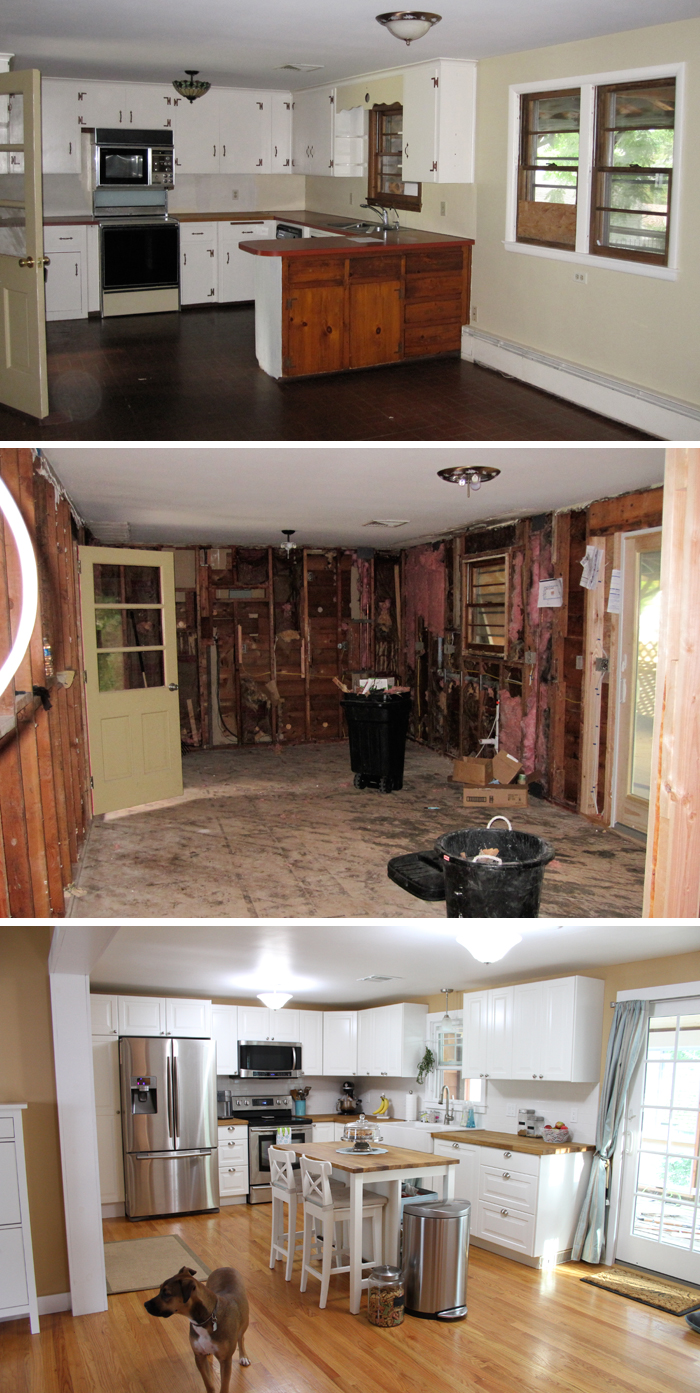
And here is the main cooking/eating/chilling out area. I went through about 2 dozen IKEA designs before I figured out where I wanted everything, and how to get the most storage out of the cabinet layout. It was a crazy and stressful process since we moved around the fridge, the stove and the dishwasher, but it has a nice open flow to it now. We lost the bar that was cutting the room in half and opted for a moveable island. We also decided on hardwood floors installed to match the existing ones in the adjacent room. No one can even tell the difference, our installer did an excellent job. We spend most of our time on the lower level of the house, so all of this was money well invested.
kitchen_overview.jpg

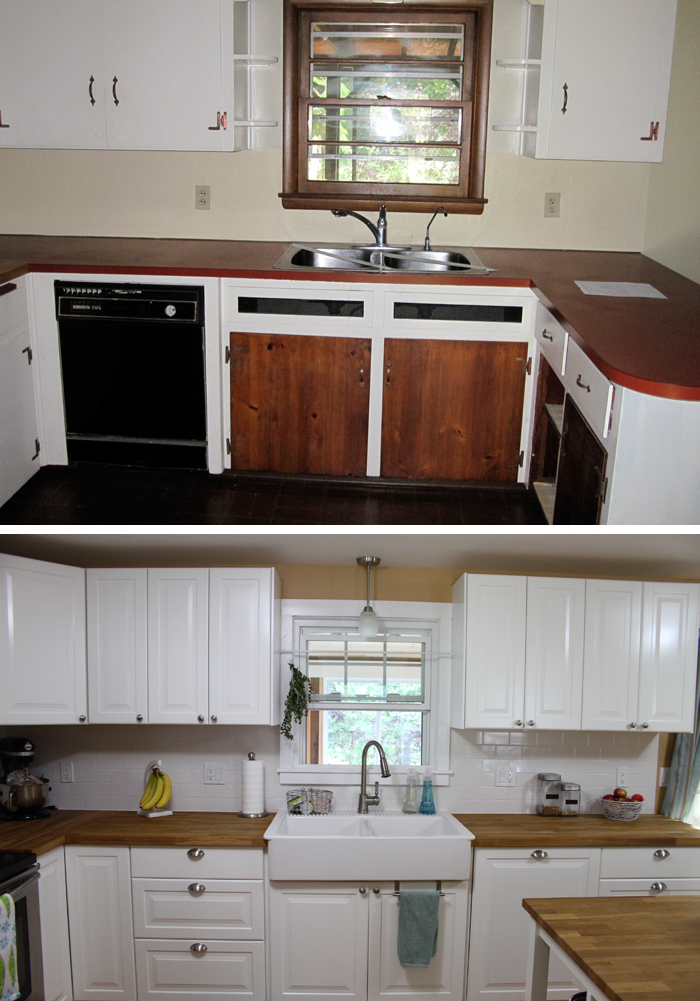
Here's a picture of my favorite sink {the second one, not the first!}. Everyone loves it and comments on it immediately upon entering the house, and the best part is, as far as farmhouse sinks go, it was fairly inexpensive. Thanks to IKEA, this only threw us back about 300 dollars. Well worth it, although, I have been known to break a glass or chip a bowl on it...
kitchen_sink.jpg

And another big decision we made in the structure of the room was to remove the very shallow food pantry and the back door, replacing it with a new laundry room and double slider. The slider lets in a lot more light than the single door and two small windows did, and the laundry room being upstairs is absolutely a must. Especially when you have a large belly and can no longer carry full baskets of clothes around.
kitchen_laundry.jpg

Well that's that. The last thing we have left to do is a crown molding to finish off the tops of our cabinets, but that'll come later, once all the other little things are finished up. All in all, we probably spent about 15 thousand on this section of the house. We were able to keep our costs so low thanks to amazing IKEA products and prices and doing most of what we could on our own, such as demo, insulating, cleanup, painting and finishing work. We did splurge to have the cabinets installed, but mostly because looking at all those flat boxes that made up our kitchen was daunting, and we had a time constraint with moving out of our apartment in time. Other than that it was one of the most stressful things we've ever done as a couple! But then again, it's probably prepared us for this bebe...

Sunday, October 02, 2011

it's a...they're not finding out!

A quick gift sewn for a friend who doesn't know what she's having yet:
IMG_9986_KatsOnesies.jpg

The tie onesie was SO quick and easy, but I spent a lot more time on the onesie dress since I had to add the elastic in myself. The flower is attached with a velcro circle, so it's easily removable before washing. I didn't know how it would hold up in the wash, so I figured better safe than sorry. {The skirt fabric was a goodwill find, that ended up being an Amy Butler organic sheet! I loved the pattern and can't wait to make more cute things with it.}

Well, I just found out I'll be working again all this week, so it'll be quiet around here again. Maybe I'll just throw a bunch of house pictures on here for you guys!
Related Posts Plugin for WordPress, Blogger...