Showing posts with label for the home. Show all posts

Friday, June 06, 2014

Into the woods: a nursery design


Well here it is. I've finally managed to put together a post about the new nursery! I honestly think nurseries may be my favorite decorating project. I love to concept and plan, and then buy all the quirky little details. Here it is, the 'nursery' side of the room:

 And here's the 'guest' side of the room. I spent several weeks in this bed getting adjusted to a newborns sleep pattern. Again.

Our task was fairly simple this time. Being our second baby, I knew exactly what I needed/wanted and what I could live without. First on the agenda, move the crib in. This wasn't as easy as it sounded since I needed to transition little E into a big-girl bed. Once she figured out the kind of freedom that came with an open-sided sleeping area, we were done for. It was a challenge but after a week or two we were adjusted.


Next I wanted a good quality rocker. The one I had with E was awkward and uncomfortable, and the wooden arms proved a danger to a thrashing doesn't-want-to-sleep-no-way child. So cushy and cozy it was. I was willing to spend money on this. In fact, it's the most expensive piece of furniture in the whole room. Maybe the whole house?

Then came the dresser. I wanted something small and simple (and maybe in need of some work/creative genius), but the husband talked me into something larger and more convenient, something that would grow with the boy and his needs. To be honest, I love it. Lots of drawers and space on top. Perfect.

The rest of the details came in bits and pieces. Finding something at a store, like the silver deer head, or making a custom pillow cover to match my desired color scheme. Stitched arrows, wooden arrows and an antique camera from a flea market.


Other things happened accidentally, like finding an adorable (inexpensive) crib sheet at Target that matched the decor or the soft blue end table I thrifted for $10. My favorite thing might just be the antique skis my mother gave me. With a little painters tape and craft paint, I added a pop of orange to one, then mounted it to the wall and added hooks for keeping baby outfits handy.

 To be perfectly honest, I love how everything turned out in this room. I had gathered a lot more items to put in the room, but as I went, I came to a point where I decided I liked the calm simplicity. And I stopped. It was perfect. And perfect for my little man.

Flea markets and antique shops are great places to find unique decor. Think about using items in different ways, like how I turned a couple of old cheese boxes into small shelves simply by mounting them to the wall. If you have any questions about items I used please let me know! Enjoy!


Wednesday, October 16, 2013

All that glitters is gold

I splurged on a clearance frame at Target with an idea in mind. If it didn't work out I figured I was only out $1.78. My bright idea? A gold accent frame. Something simple and subtle and to be honest, the result was exactly what I was looking for.

Start with a cheap frame, it doesn't need to be accented with a color like mine was, just have a bit of an edge so the gold paint actually shows up. Subtle but not invisible, right? Then buy yourself some gold metallic paint. You don't have to go with a tub of paint like I did, I was just saving myself a trip to the craft store since I already had plans for the home improvement store. I show a sponge brush, but really in the end I just ended up using a regular brush to avoid all the bubble/texture effect that I was getting using the sponge.


After a few coats, this is the result:


Ahhh, that's better. Simple, sweet and a touch of glam. {Sorry about the photos, they're iPhone pics!}

Saturday, October 05, 2013

This old foreclosed home: a coat of paint covers all sins

So maybe a coat of paint doesn't cover all the sins of ignoring exterior maintenance, but it sure helps. This poor house sat sad and alone for who knows how long, so it's safe to say the exterior was ignored. Since we finished 98% of the interior build/projects, this summer has been all about the outdoors. We've taken back control of the landscaping, laid a bunch of rocks and torn out a lot of weeds, but we still have finish work to do like leveling out areas and planting grass.

Our shed and barn need a majority of the work as well, and at this point we're still trying to decide if we keep and repair the old, or we knock it down and replace it with something we really want, that functions the way we need it to. Tough decisions like that usually get weighed on the budget scale...

Another glaring problem was all the ignored wood around the place. Our back stairs off the sunroom were about to be replaced until we decided to try a product called 'Deckover' by Behr. You can find it at Home Depot. It's like painting with cake batter. Thick and stinky, but it goes on well and fills in gaps and holes. Once we did that, it seemed like the steps were fine! They'll last a few more years anyway, until we've stopped hemorrhaging money and a couple hundred dollars to fix some steps doesn't seem like a big deal.

Since that worked so well, I decided the front porch could use a coat. Plus, it was a nice color that matched our brown trim{not my favorite, but oh well}, Dark Walnut. After a good wire brush scraping to remove built-up mold and peeling old paint, I shopvacced the area, removed all the leaves and went to work.

Here's a quick before and after comparison. I should have taken a few close-ups to show the worn out state of the place, but this will have to do. Trust me, after your porch/deck has been ignored for probably ten years, it's going to look sad. So now we have this updated and clean porch to walk onto every day! I love that the exterior white primer/paint combo I used for the railings really makes them pop. You didn't really notice there was a porch there before! Another side thing happened during the project that affected the look as well. Our oil tank leaked and we had to have it replaced. At that time we decided to move it across the basement like we wanted {if we're paying for it anyway!} and remove the ugly stinky pipes from the front sidewalk. They're now lovely and tucked away on the side of the house behind a bush. Not sure why they were in the walkway in the first place anyway! For now my potted mums are hiding the patch of concrete and the chopped pipes that we'll have to fix.


Another quick project I decided to tackle while I had all the supplies handy was painting the front porch columns. It wasn't that time-consuming, but I think it makes the whole mix of white and brown trim look a little more planned. Plus, they were worn as well and needed a little tlc before they became too bad to save. So just an hour or so and a few coats of white paint freshened everything up a bit. Now the sidewalk just needs a good powerwashing and we'll be ready for winter...


Friday, July 12, 2013

I'm hooked: a DIY hanging station

So you know all those beautiful knobs and drawer pulls that are all over the place now? I have a slight addiction. I pick them up all over the place and have a stash ready for when a project pops into my head. Like this one. A sweet little hanging station for behind the door.

This version is simple. All I did was cut a piece of pallet board down to the size I needed, and drilled three holes clear through, large enough for the hardware on my drawer pulls to fit through. The tricky part is drilling a hole large enough to fit the nut on the backside, but only halfway through the board. You want to be able to make your hardware completely flush with the back of the board so it hangs nice and smooth on the wall.

When I had all the pulls/knobs tight on the board, I took a metal saw blade on my Dremel and cut off the backs of the screws that were sticking out past my board. I didn't take pictures along the way, but I'm sure I'll be making more of these, so I'll try to remember to document the steps next time.

So after about 15 minutes, I had myself a custom hanging station for the guest room. Give it a shot, they're extremely easy. And I just hung mine up with a couple of drywall screws that you really can't see unless you're looking too close...


Wednesday, June 12, 2013

Easy {& cheap} wall art for the home

Have a wall to fill but don't have big money to spend on frames? Try thinking outside the frame. Buy a few photo mattes, print some family photos and hang them using simple office supplies like binder clips. I went all fancy and decorated my clips with washi tape. I made a grouping of three 11x17s with 5x7 openings but you can do whatever works for your space. Maybe a pair of 2 or a group of 6 in two rows of three? The possibilities are endless. And you can change out the photos in a jiff!


Monday, June 10, 2013

Craftilicious: IKEA $3 pillow hack

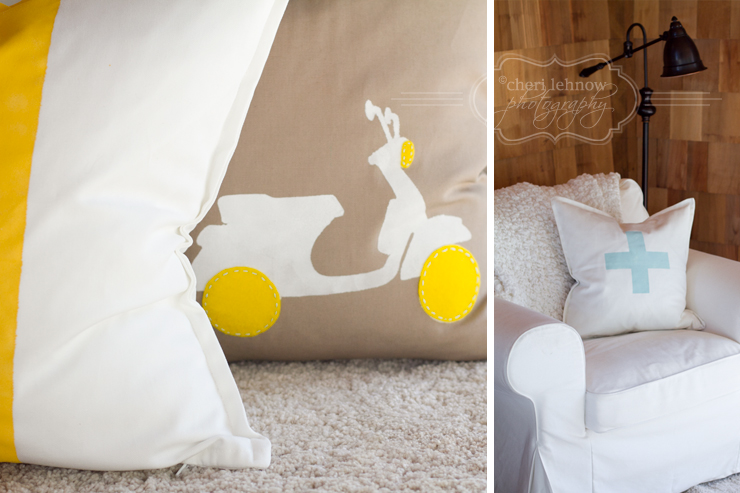
How great are these pillows?! AND they cost me three dollars per cover. {!!} These IKEA Gurli covers are $3 a piece. Seriously. You can't even buy the material and the zipper for that much. Then the time to make them...yeesh.


So I splurged on the covers {ha} and spent the time on the embellishing part. And honestly, it took me an hour to do all five? {There's a duplicate not pictured, since it's going up in the guest bedroom...}

To make your own, you need a computer, Word {ick, but sometimes that's all you've got} or a graphics program, some fabric paint, a couple of foam brushes, scissors {an exacto knife works much better} and freezer paper.

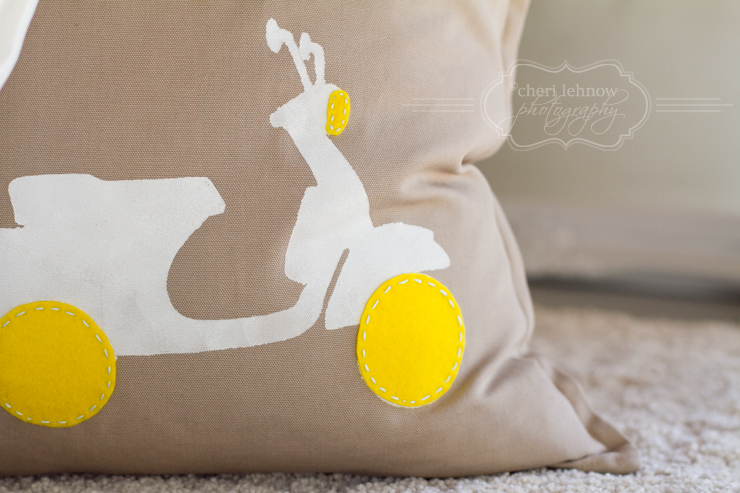
I pulled a scooter graphic from the web, enlarged it to letter paper, printed it and traced it onto my freezer paper. {I added the felt wheels and headlight just for fun, but it's not necessary.} The image you choose doesn't have to be great quality since you're just tracing over it and you can adjust the edges to be smooth when you cut them. The + and the & are GillSans BOLD font enlarged to letter size, printed and traced onto freezer paper. If you've never done freezer paper stencils then you don't know what you're missing. The yellow color block pillow was just made using masking tape. 

I mixed my own color for the blue, but the yellow is straight out of the bottle. Once you have your freezer paper stencils ironed to your pillows, put a piece of cardboard in the middle to avoid bleeding onto the back and start applying your paint making sure to press straight down onto the pillow to avoid bleeding under the stencil. It's not likely but it can happen and you'll be sad when you remove the stencil and you have a blob outside the line...

That's it, it's easy! The hardest part is picking what you want for your designs. Enjoy the process!
Related Posts Plugin for WordPress, Blogger...