Friday, June 28, 2013

Learning our colors, crafty-style

I sometimes forget that I need to teach her a few things here and there, like counting, colors, words, shapes, how to brush her teeth, to be polite {actually, we're really good at that one} and pretty much everything. Usually it just takes showing her once. Then she picks it up and we move on. Well, I decided if we were going to learn our colors, it might as well be creatively. Because she is, after all, my daughter.

I give you peak-a-peeps! Silly name I know. But the general idea is there. Learn your colors and learn how to compare and match them up.

You can pick up packages of these little candle cups and the wooden pegs at any craft store. I just used acrylic paints and sealed with a spray gloss. Simple enough to do in front of the tv. Well, besides the gloss sealant part. I don't think the husband would appreciate me spraying that stinky mess on the living room floor.


I think she likes them! And I can already see her little brain making the connections of color to color. Success!


Wednesday, June 26, 2013

Ah, summer, with your necessary indulgences.

You know what's hilarious? The faces you make when running through a sprinkler. Seriously. Hilarious.


 And then there's the sandbox I made. It is a BIG hit with the wee one. She loves digging and burying and unearthing. We've been taking a lot of baths around here lately. Ahhh, summer.


Monday, June 24, 2013

Moon moon moon, shining bright

After a quick set-up, I was able to capture this image of the giant moon. Not bad for a simple DSLR. But this is why you need to use your manual settings. You can get incredible pictures, but not if you rely on the automatic modes to do it for you. Just bought yourself a thousand dollar camera? Then it's time to invest in a basic course on how to use it. Most of these courses are offered at your local community colleges or even your local camera shops. Look around, it's well worth the hundred dollar investment. You'll have a lot more photos you're proud of and you'll be getting your money's worth out of your camera. You should also invest in a photo editing program like Lightroom or Photoshop Elements. But just remember kids, a fancy photo effect doesn't make a crappy photo good, it just makes it look like a crappy over-edited photo. {End rant.}


Friday, June 21, 2013

Craftilicious: the wooden peg family

With a little acrylic paint, a few wooden pegs from the craft store and an hour in front of the tv, I was able to make us into a little peg family. {Just don't forget to seal the final product with some spray gloss sealer!} Because every kid needs a miniature version of their family, right? Turns out, E's been using them in her 'Little People' house. They're a bit small for all the holes, but she doesn't seem to mind. And I don't mind that they cost less than a quarter of what 'Little People' are going for these days! I think it's time to make a few animal versions. After all, doesn't the dollhouse need some farm animals if it plans to be self-sufficient?


Monday, June 17, 2013

Bebe Van Gogh

To say we had a good first time painting, would be a serious understatement. I guess anything that gets you dirty must be fun? At least that's what a toddler thinks. And anything that leads to a bath is just plain awesome. So, she did really well with her first experience. I think we found our new rainy day activity. Absolutely.


Friday, June 14, 2013

Craftilicious: shabby chic frame tutorial

You know those frames that are all the rage but cost an arm and a leg? Well I figured out how to make one for 2-3$ assuming you have the supplies on hand. First you need to get one of those nifty 40-50% off craft coupons. Then you need to get to Michaels, pick one of the ready-to-finish frames from their raw wood aisle, use your coupon and only pay a few dollars for the frame.

Now you'll need some leftover paint {I used the white from my house trim}, some sandpaper, wood stain, and paintbrushes/rags.

The first step is to use the sandpaper to round all the edges on the frame, giving it more dimension. The original frame is all straight edged and won't give you that good crafted look we want. I actually used a Dremel to make my edges but sandpaper would work just fine.

Next you'll paint your frame whatever color you prefer. Keep it light though, so your stained edges don't get lost. Once the paint is completely dry, maybe wait a day or so, take the sandpaper and give your edges a worn look, so the raw wood comes through the paint. Now take your wood stain, and lightly apply it to those raw areas and then wipe off immediately. All the raw areas will soak up the stain so be deliberate with where you want it.

That's it, a cheap fabulous frame, enjoy!


Wednesday, June 12, 2013

Easy {& cheap} wall art for the home

Have a wall to fill but don't have big money to spend on frames? Try thinking outside the frame. Buy a few photo mattes, print some family photos and hang them using simple office supplies like binder clips. I went all fancy and decorated my clips with washi tape. I made a grouping of three 11x17s with 5x7 openings but you can do whatever works for your space. Maybe a pair of 2 or a group of 6 in two rows of three? The possibilities are endless. And you can change out the photos in a jiff!


Monday, June 10, 2013

Craftilicious: IKEA $3 pillow hack

How great are these pillows?! AND they cost me three dollars per cover. {!!} These IKEA Gurli covers are $3 a piece. Seriously. You can't even buy the material and the zipper for that much. Then the time to make them...yeesh.


So I splurged on the covers {ha} and spent the time on the embellishing part. And honestly, it took me an hour to do all five? {There's a duplicate not pictured, since it's going up in the guest bedroom...}

To make your own, you need a computer, Word {ick, but sometimes that's all you've got} or a graphics program, some fabric paint, a couple of foam brushes, scissors {an exacto knife works much better} and freezer paper.

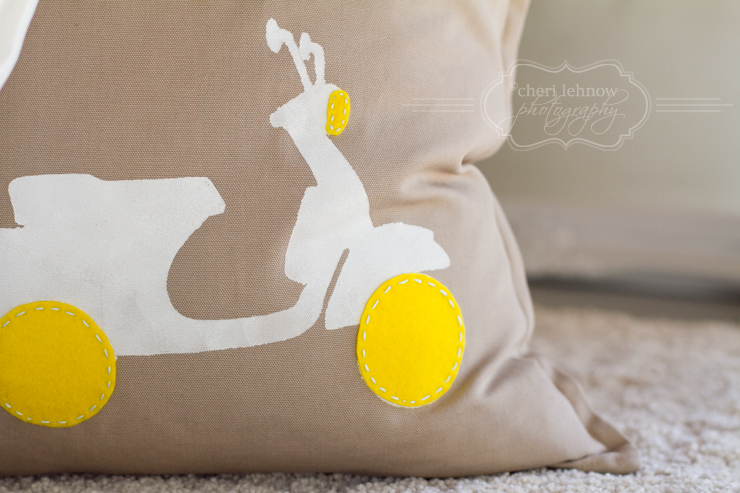
I pulled a scooter graphic from the web, enlarged it to letter paper, printed it and traced it onto my freezer paper. {I added the felt wheels and headlight just for fun, but it's not necessary.} The image you choose doesn't have to be great quality since you're just tracing over it and you can adjust the edges to be smooth when you cut them. The + and the & are GillSans BOLD font enlarged to letter size, printed and traced onto freezer paper. If you've never done freezer paper stencils then you don't know what you're missing. The yellow color block pillow was just made using masking tape. 

I mixed my own color for the blue, but the yellow is straight out of the bottle. Once you have your freezer paper stencils ironed to your pillows, put a piece of cardboard in the middle to avoid bleeding onto the back and start applying your paint making sure to press straight down onto the pillow to avoid bleeding under the stencil. It's not likely but it can happen and you'll be sad when you remove the stencil and you have a blob outside the line...

That's it, it's easy! The hardest part is picking what you want for your designs. Enjoy the process!
Related Posts Plugin for WordPress, Blogger...